Working with the Orders Block
For quick and convenient parameter setup, the TV-chart panel in the “Chart” block has an order management menu.
You can display a projection of a future order on the chart from the Orders block in two ways:
First select the trade size via the percentage field or enter it manually — the order projection will automatically appear in the Chart block.
Click the word “Price” — a projection of a future limit order will appear on the chart; then place it at the needed price and only after that specify the size in the quote or base asset.
Example:
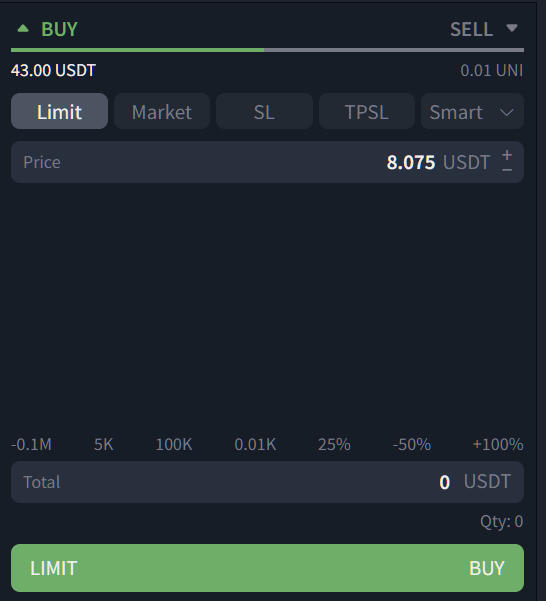
Switching between buy and sell orders is done via the “BUY / SELL” toggle; the color and the label of the action button (“BUY / SELL”) change accordingly.
Order type configuration is done by activating the corresponding button on the quick-access panel or via the dropdown menu.
Clicking the word “Price” displays a limit order projection on the chart.
Order Type Tabs
The block offers 7 order types:
Limit — a limit order at a specified price.
Market — market execution.
Stop Limit — stop trigger + limit price.
Smart (Bracket) — scenario form “entry + management (TP/SL)”.
TPSL — take-profit/stop-loss for an existing asset/position.
Trailing Stop — a trailing stop that follows price.
Grid — a grid of limit orders.
Limit, Market, Grid, Trailing Stop, and Stop-Limit — standard order handling similar to exchange interfaces.
Switching between buy and sell is done with the “BUY / SELL” toggle; the color and caption of the action button (“BUY / SELL”) change accordingly.
Limit and Market tabs — standard order handling, analogous to an exchange UI.
Clicking “Price” in the Buy/Sell block or entering size in the Total field displays a limit order projection on the chart.
Stop-Limit Tab
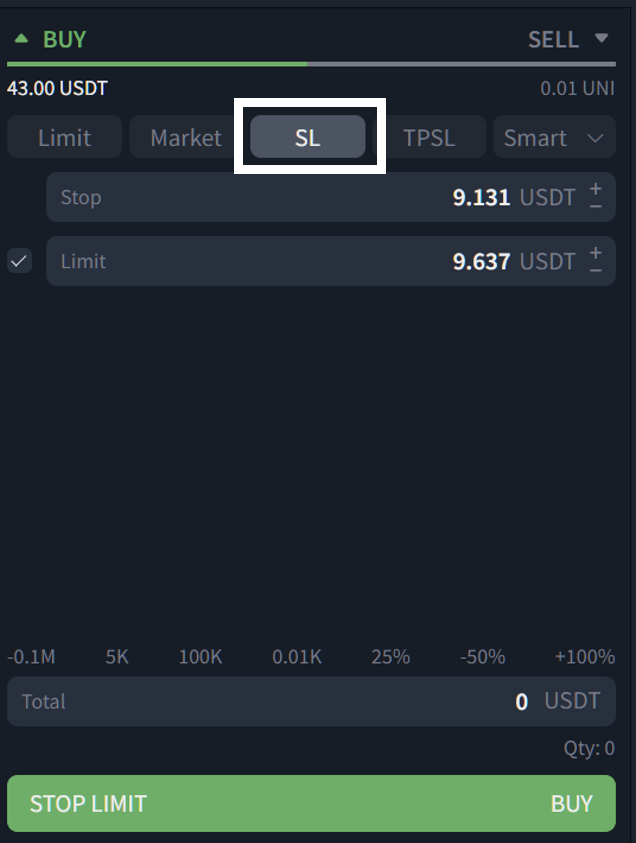
When you open Stop-Limit and specify size or click the words Stop | Limit, the chart automatically shows the limit and stop (trigger) indicators. Moving an indicator updates the corresponding price field.

Stop-Limit can be used for both deferred buy and sell orders.
Stop-Limit Settings
The “Stop” field is the trigger that activates the “Limit” field.
Example. With current price 8.632 UNI/USDT, you want to exit by stop when price reaches 8.495. Enter 8.495 in “Stop”. In “Limit”, set the price at which your order appears in the book (usually below the Stop value to avoid slippage). In the screenshot example, that’s 8.205, which is 3.53% below the Stop (gap in percent).
IMPORTANT! When placing a Stop-Limit, a limit order (the “Limit” field) appears on the chart and can be moved. BUT the trigger (the “Stop” field) does not change from the chart and is not displayed. To change the stop trigger, move the SL Stop projection itself.
TPSL Tab
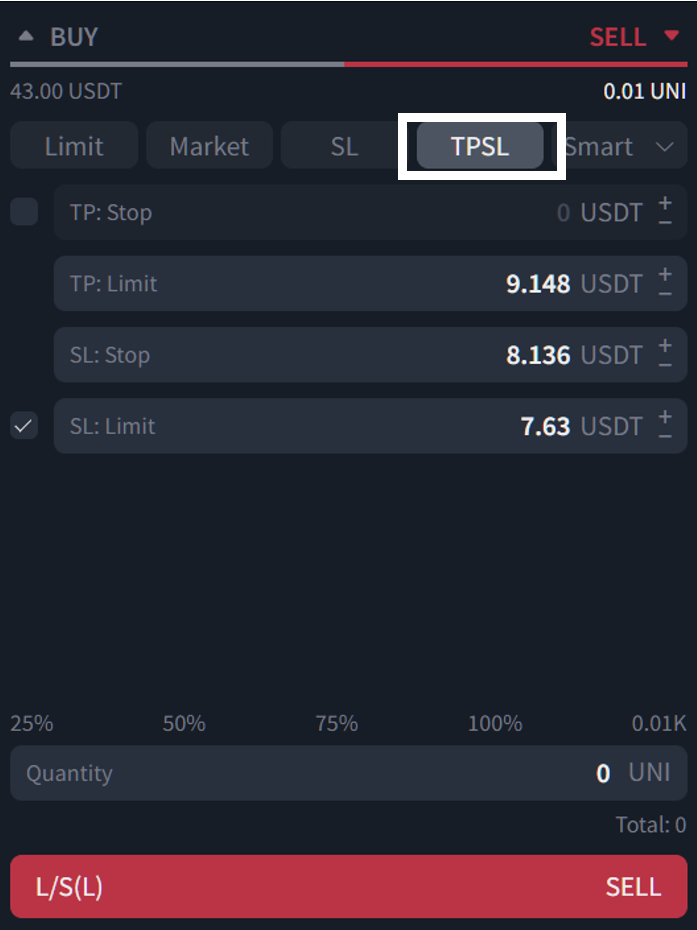
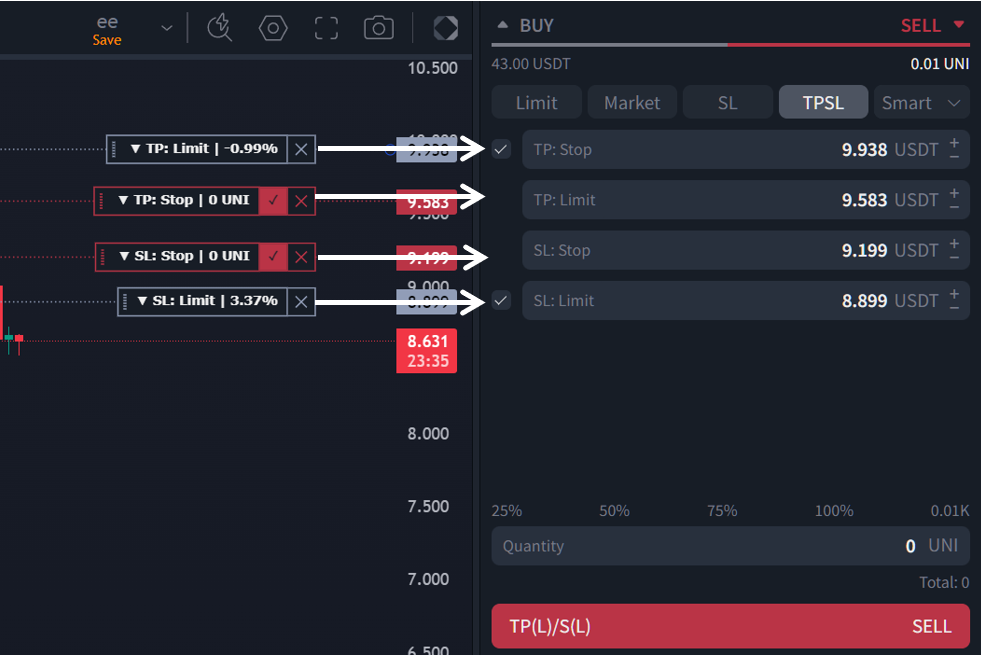
When you open TPSL and specify size, or click the words SL:Stop | TP:Limit | TP:Stop | SL:Limit, the chart automatically shows the limit and stop (trigger) indicators. Moving an indicator updates the price field.
The projections are named identically to the block fields for easier association.
TPSL is an OCO-like order that lets you place Take-Profit and Stop-Loss simultaneously.
TPSL Settings
The “SL:Stop” field is the trigger for “SL:Limit.”
Example. With current price 23109.33 BTC/USDT, you want to sell at 23116.47. Enter 23116.47 in the TP:Limit (top) field. The rest follows the Stop-Limit logic.
The “TP:Stop” and “SL:Limit” fields with active checkboxes are optional:
- With “TP:Stop” enabled — volume is reserved but not shown in the order book. After the TP:Stop level is touched, the reserved volume is placed into the book at TP:Limit.
- With “SL:Limit” disabled — upon reaching SL:Stop, the order executes by market.
You can also create a TPSL by converting a limit order: open the context menu (right-click) on the chosen limit order → select the option → set SL:STOP and SL:LIMIT on the chart → confirm with the green checkmark.

After creating a TPSL, only the limit order is visible on the TV-chart. To view the trigger and stop positions, left-click the limit order (by its size label).

Futures and Hedge Mode
When you open futures pairs, the Buy/Sell block changes slightly. If One-way mode is enabled:
- Tabs show “+ | − | x” buttons when a position exists on the active pair:
+ — increase position, − — partially reduce, x— fully close.
- In Stop-Limit and Smart, an “X” button appears to place a Stop Market that closes the entire open position by market. It’s available only if a position exists on the active pair.
- In all tabs except TPSL, there is an interactive indicator of the current leverage on the selected pair. Clicking it opens a modal to change margin type and leverage.
When switching to Hedge mode (long and short simultaneously), “+ | − | x” mean increase (+) and reduce (−) respectively.
Workflow Logic
Example: You have two open positions on the same pair (long and short). You need to increase the long position by market and reduce the short position via a reduce order.
Increase the long position by market:
Switch to Market
Choose Long
Choose action “+” (increase)
Enter the size
Click “Increase”
Reduce the short position with a limit order:
Switch to Limit
Choose Short
Choose action “−” (reduce)
Enter the size and the price (or place a chart projection via the Price button)
Click “Reduce”
To place a Stop Market order in Hedge mode, use the Stop-Limit or Smart tab and the “X” button (available only if a position exists on the active pair).

Details on Order Types: Smart | TPSL | Trailing Stop
Smart Order
Smart lets you enter a trade and immediately place TP/SL with one action. It saves time and reduces errors versus placing multiple orders manually.
What Smart does
- You set entry type: Market / Limit / Stop-Market / Stop-Limit.
Add management: TP (up to 4) and/or SL.
Then the algorithm handles it:- Spot BUY: opens a buy → places TP Limit(s) and a virtual SL (market trigger, tracked by the platform).
- Spot SELL: sells the existing asset → places 1 TP and optionally a virtual SL.
- Futures Open: opens a position → places real TP Limit (with RO) and real SL Stop-Market (RO).
- Futures Reduce-Only: reduces a position → 1 TP + optional SL.
Spot: SL is virtual (tracked by the platform; not shown on the chart).
Futures: SL is real (displayed on the chart).
How to use
To show limit projections on the chart, you can:
Select size first (percentages or manual) — the projection appears automatically in the Chart block.
Click “Price” — a future limit order projection appears; place it at the needed price and then specify size in the quote or base asset.
Activate/deactivate fields:
“Trigger” (stop field) — creates a deferred order that activates at the trigger price.
“Price” — when enabled, the order is limit; when disabled, it will execute by market upon confirmation.
“TP” — take-profit; for buys, Smart will place TP at the set price (can be disabled).
“SL” — stop-loss; for buys, Smart places SL at the set percentage from entry (can be disabled).
“Risk” — Smart can work by risk. At the bottom, under the size input, click Risk: the size field switches to risk-based mode and auto-calculates the needed size for the specified risk.
If you enter size in base asset units, it will calculate and show the risk value (if stopped) for that size.
This option is available if SL is enabled on the Smart tab.
4. Confirm by clicking the green “Buy” button in the block, or the checkmark on the chart projections.
- Тип: Market / Limit / Stop-Market / Stop-Limit.
- Сопровождение: TP (до 4 уровней) и/или SL (1 уровень).
Что произойдёт после подтверждения заявки:
- Spot BUY: купим → алго поставит TP-лимиты (реальные) и виртуальный SL (маркет-триггер).
- Spot SELL: продадим имеющийся актив → 1 TP (тип на выбор) и опц. виртуальный SL.
- Futures Open (Long/Short): откроем позицию → поставим реальные TP-Limit (RO) и реальный SL-Stop-Market (RO).
- Futures Reduce-Only: сократим текущую позицию → 1 TP (RO) + опц. SL (RO).
Коротко: Spot — SL виртуальный, Futures — TP/SL реальные (RO).
TP и SL считаются от фактической цены входа; В случае выставления нескольких тейков объём делится на тейк профиты поровну.
Как начать (самый быстрый путь):
- Выберите Market (убрать галочку напротив лимит).
- Включите SL (защита) и добавьте 1–3 TP (фиксация прибыли).
- Нажмите «открыть\купить» — аглоритм всё расставит за вас.
Полезно знать:
- Клик по заголовкам полей (Цена, Триггер, TP, SL) — активирует\деактивирует проекции на графике.
- Кнопки + / –, стрелки и колесо мыши — быстро меняют значения по шагу тик-сайза.
- Доступна работа как от объема депозита, так и от риска.
TPSL (Take-Profit / Stop-Loss)
What it does: lets you quickly add TP/SL to an already open trade or position, without a new entry.
Where used
Spot SELL: for coins you already hold.
Futures Reduce-Only: for reducing an open futures position.
TPSL doesn’t open entries — use Smart if you need “enter + TP/SL”.
What to set
TP: 1 level (types: Limit / Take-Profit Sell/Buy / Stop-Market Sell/Buy).
SL: 1 level. On Spot — virtual (market trigger); on Futures — real (RO).
What happens after confirmation
Spot SELL: the algorithm places TP and cancels SL, or vice versa.
Futures RO: exchange OCO — one executes, the other is canceled.
How to start
Open TPSL, set TP (and SL Limit if needed), verify size (≤ available), confirm.
If you uncheck SL Limit, the stop will be market.
Trailing-Stop
What it is: a “following” stop — lets price move in your favor and closes by market on a pullback.
Parameters
Offset (Stop, %) — how many percent the trailing follows price (0.1%–20%).
Activation (optional) — the price after which the trailing starts.
Limit — limit take-profit price (if supported by your exchange/market).
How it works
Activation.
If not set — trailing starts immediately after order creation.
If set — starts only after price crosses the activation level.Following.
After activation, the trailing level moves only in the favorable direction:
for buy — behind the new low; for sell — behind the new high;
by a step equal to the offset (%).
On the chart, typically only the activation projection is shown.Execution.
When price reverses and crosses the trailing offset, the order executes by market.
Short example: offset 1%, sell mode — once price drops 1% from the last high after activation, a market close occurs.
Exchange specifics
OKX — shows a “live” trigger price (you can see the level trail).
Binance — shows mainly the activation/execution moments. The trailing logic is the same, but it’s not visualized on the chart.
Quick setup
Choose Trailing-Stop and side (buy/sell or Reduce-Only to cut a position).
Set the offset (%) and, if needed, activation price; or uncheck activation for immediate market activation.
Confirm (Buy / Sell / Reduce).
You can place projections from the chart: click the “Price” header — a line appears, drag it to the desired leve
An existing Limit-TP can be converted to trailing (right-click the order → “Convert to Trailing-Stop”).
Short task guide
“I want to enter and immediately protect / set targets” → Smart.
“Position already exists, I can place …” → TPSL.
“I want the stop to trail price and capture profit on pullback” → Trailing-Stop.
More details on configuring the Buy/Sell block are in the article: “Buy/Sell Block”
Link to the article: https://lexxtrade.freshdesk.com/a/solutions/articles/103000369462?lang=ru-RU
Was this article helpful?
That’s Great!
Thank you for your feedback
Sorry! We couldn't be helpful
Thank you for your feedback
Feedback sent
We appreciate your effort and will try to fix the article